DESCRIPTION OF CONTROL PANEL FUNCTION PROGRAMMING
The PulsON alarm system software has been designed to provide the installer with the widest possible range of configuration options, allowing them to tailor the system to the facility’s specifications and the customer’s expectations.
The chapters in this manual reflect the layout of options in the installer menu accessible via the keypad, as well as in the Alarm Configuration 2 configuration program.
System Programming – General Requirements
The panel can be programmed by the system installer using the keypad or a computer running at least Windows 7. Programming requires the Alarm Configuration 2 software and a USB cable with a Type B connector.
Note
The Pulson Alarm Configurator program works only with the Windows operating system.
System programming is possible (in accordance with EN50131 Grade 2) only after the system user has granted permission for programming. The user authorizes programming by logging into the keypad, selecting the Settings section from the menu, then choosing the Allow Service option, and specifying the time required for the installer/service technician to perform work on the system. During service, the installer’s code allows them to log into the keypad.
Default access codes:
| Code type | Code |
|---|---|
| Master user code | 8888 |
| Installer code | 4321 |
Programming Mode – System Operation Restrictions
While the installer is in the installer menu or has an active connection to the configuration software, the system cannot be operated. This means that:
- The system does not generate any alarms
(including priority alarms from the 24-hour zone and from keypads) - Schedules are ignored
- On all keypads (except the one used by the installer) the following message is displayed:
programming in progress - No partition can be armed
(from the keypad, the app, or key-type zones) - No type of alarm can be triggered in the system
(all alarms are blocked, including 24-hour alarms, tamper alarms, etc.; for example, opening a detector or the control panel enclosure will not trigger an alarm)
Note
It is not possible to program the control panel simultaneously from the keypad or the configuration software, either locally or remotely.
Programming via the Keypad
An installer can program all functions of the PulsON Alarm 4G alarm system using the keypad in exactly the same way as through the configuration software.
However, we recommend programming the system using a computer and the Alarm Configuration 2 software. This is much more convenient than programming via the keypad, and it also allows you to save a copy of the panel settings in the software’s memory, which is useful whenever service work is performed.
PROGRAMMING USING THE LCD/C AND LCD/S KEYPADS
The installer programs the control panel after obtaining the user’s consent. The user grants consent for service access to the control panel by enabling this function on the keypad. Enter the user code, press the OK/Menu button, select the Settings tab in the menu, and confirm with the OK button. Next, select the Allow Service option and, from the displayed time periods, choose the one appropriate for the situation, confirming the selection with the OK button. Service access can be granted for 1, 2, 4, or 8 hours, 1 day, or indefinitely. The selection will be confirmed by a message on the keypad indicating the current duration of service access to the control panel and the End option, which the user can use at any time to disable the installer’s access to the control panel’s programming functions.
After entering the installer code [default 4321], the installer logs into the system (the key symbol in the upper-right corner of the screen will disappear) and, by pressing the OK Menu button, gains access to the service menu.
To program the panel’s functions, use the cursor keys (buttons 2 and 0) to select the Installer Programming option and confirm with the OK Menu button.
Installer Programming

A message will appear prompting you to “Enter the installer code,” where you must re-enter the installer code. The control panel will open the programming menu, providing access to all system functions, the same as in the configuration software.
Note
In installer programming mode, you can retrieve the PC Access Code, which is required when connecting the control panel to the Alarm Configuration 2 configuration software. Once you have access to programming mode, go to the System > General tab; after scrolling down to the next screen, you will obtain the code needed to connect to the computer.
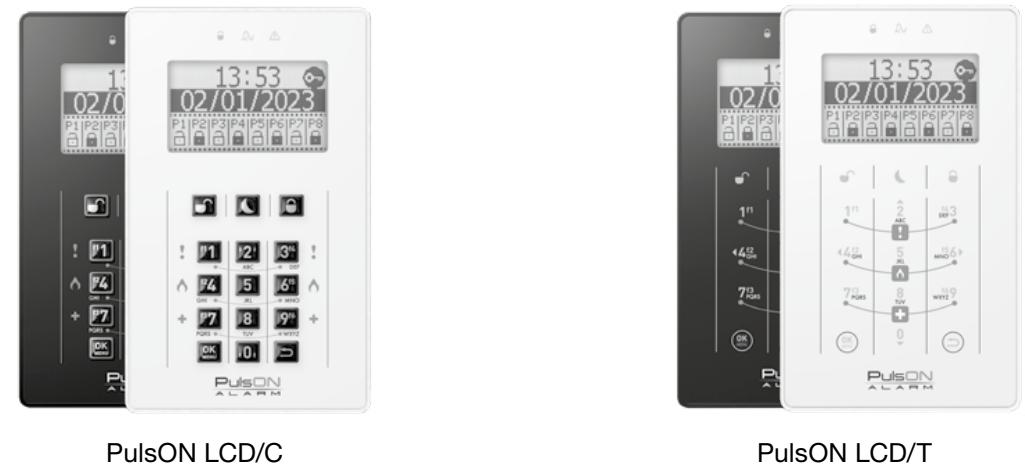
To navigate the menu on the main screen, in the user menu, and in the installer menu, use the navigation arrows on buttons 2 (up), 0 (down), 4 (left), and 6 (right), as well as the OK and Back buttons; while to move the cursor to the right or left, hold down the 4 (left) or 6 (right) keys for about 2 seconds. To delete text, hold down the Back key for about 2 seconds.
When entering names and descriptions using the keypad, use keys 2 and 0 (up and down arrows) to toggle between uppercase and lowercase letters: key 2 for uppercase, 0 for lowercase. Press and hold the key until the letter case changes.
The installer also has access to the following menu options: Event Log, Trouble Overview, Outputs, Settings.
Use the 2 and 0 keys (up and down arrows) to select the desired functions.
Event Log
Troubleshooting
Output Control
Settings
Note
Remote software updates for the control panel are possible only on a control panel connected to the cloud, and only when the alarm system is completely disarmed. During the update, no actions can be performed on the alarm system. The update progress is displayed on the keypad as a percentage
It is also possible for an installer to remotely update the control panel’s software using the Supervisor tool.
PROGRAMMING THE CONTROL PANEL USING THE TOUCHBUS 7" KEYPAD
The installer can program all functions of the PulsON Alarm 4G alarm system using the keypad in exactly the same way as through the configuration software. However, we recommend programming the system using a computer and the Alarm Configuration 2 software. This is much more convenient than programming via the keypad, and it also allows you to save a copy of the panel settings in the software’s memory, which is useful whenever service work is performed.
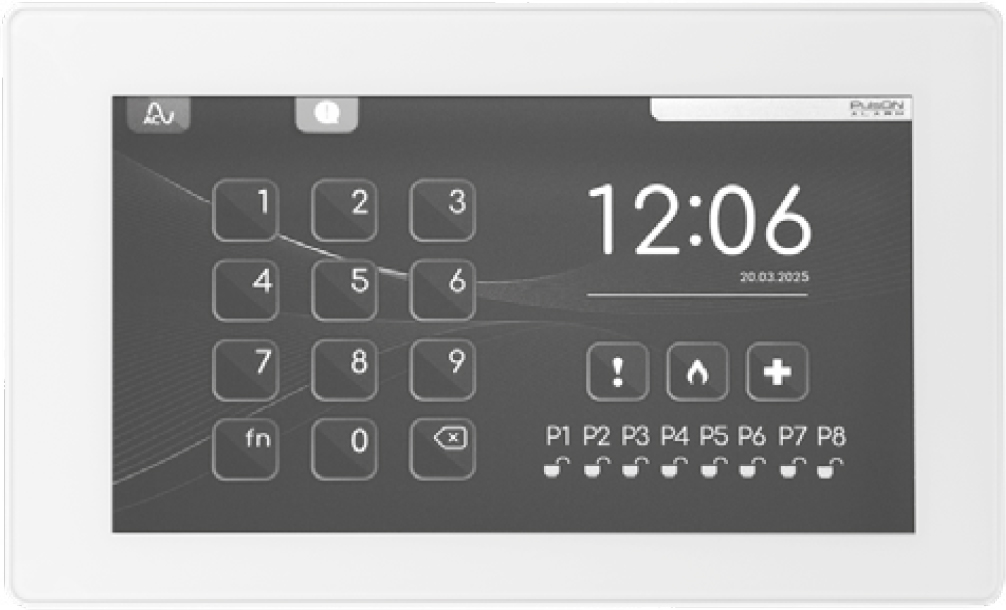
Navigating the menu is done in the typical manner for touchscreens, and descriptions are added using a convenient on-screen keypad. To navigate through certain menu options, use the up and down navigation arrows. To exit a given function or log out, use the arrow button; to return to the main menu, use the button with the house symbol.
Note
The tablet keypad is set to address 8 by default, so you must program the partition assignment and other keypad functions for this address. To change the tablet keypad’s address, turn off its power and then turn it back on. During the restart, the PulsON logo will appear. Tap the logo to open a window where you can change the address. After changing the address, rescan the bus.
Consent for the installer to access the control panel’s programming mode
The installer programs the control panel after obtaining the user’s consent. If the user does not give consent, entering the installer code will display the message “Invalid code. Try again.” The user grants service access to the control panel by enabling this feature on the keypad after logging in with their master user code. After entering the user code, press the  button, select the Settings tab, then select the “Allow Service” option, and choose the appropriate time period from those displayed. Service access can be granted for 1, 2, 4, or 8 hours, 1 day, or indefinitely. Your selection will be confirmed by a message at the top of the screen indicating the current duration of service access to the control panel. Using the Disable option, the user can disable the installer’s access to the control panel’s programming functions at any time. This will be confirmed by the message “Service Mode INACTIVE.” To exit the menu,
press the arrow button in the lower-right corner of the screen several times.
button, select the Settings tab, then select the “Allow Service” option, and choose the appropriate time period from those displayed. Service access can be granted for 1, 2, 4, or 8 hours, 1 day, or indefinitely. Your selection will be confirmed by a message at the top of the screen indicating the current duration of service access to the control panel. Using the Disable option, the user can disable the installer’s access to the control panel’s programming functions at any time. This will be confirmed by the message “Service Mode INACTIVE.” To exit the menu,
press the arrow button in the lower-right corner of the screen several times.
After entering the installer code [default 4321], the installer logs into the system. By pressing the Gear button, the installer opens the following menu options: Configuration, Event Log, Troubles, Outputs, Settings, and Users (only for changing their own code). Options not available to the installer are indicated by black icons. Event Log and Outputs are also accessible via dedicated buttons in the main menu.
Configuration – System Programming
To program the panel’s functions, press the button, select the Configuration option, and confirm with the installer code. The programming menu will be displayed, with a layout identical to that on other
keypads and in the configuration software.
Outside of configuration mode (control panel programming), the installer has access to the following functions:
Event Log
 The event log can display at least the 1,000 most recent events that have occurred in the system. Events related to the operation of the alarm system are stored in the event log in the order in which they occurred. Events are displayed from the top, starting with the most recent ones. Each event includes the date and time it occurred, a description, and information about which partition, user, or device it is associated with.
Troubles
 The trouble overview section displays currently occurring system troubles. Troubles indicate an irregularity in the operation of the system or its peripherals. To determine the exact cause of a trouble, it is also helpful to review the event log, where system events list the cause of the trouble in chronological order alongside other system events. To clear the trouble memory, press the Clear Troubles button.
Outputs
 This function allows you to control programmable outputs located on the control panel’s panel or expansion modules. You can control outputs defined by the system installer as “User Outputs.” To enable an output, slide the control slider to the right for the selected output. The slider’s color will change from red to green, and the output will activate.
Users
 In this feature, the installer can change the installer code. After installing the control panel, the installer code should be changed for system security reasons.
Settings
 This feature allows you to set the time and date, grant service access (authorize the installer to perform service tasks, including remote updates to the control panel software), enable a walk test (Walktest), customize the keypad settings to the user’s preferences, restart the system, initiate a remote update, and view system information (software versions of system components).
Zone Status Information
 Tapping the “i” icon displays the status of the control panel’s partitions and monitoring zones (inputs). The zones
are color-coded: ready, not ready (violation), alarm in memory, and zone tamper. This feature
is useful during system startup, testing, and maintenance.
Tapping the “i” icon displays the status of the control panel’s partitions and monitoring zones (inputs). The zones
are color-coded: ready, not ready (violation), alarm in memory, and zone tamper. This feature
is useful during system startup, testing, and maintenance.
Programming via a Computer
We recommend programming the PulsON Alarm 4G alarm system using a computer. This is much more convenient than programming via the keypad, but it is also important to be able to save a copy of the panel settings in the program’s memory, which is useful whenever service work is performed.
Connecting to the Configuration Program
To program the system, you’ll need a computer running Windows (version 7 or later) with the Alarm Configuration 2 software installed, as well as a USB-B (“printer”) cable.
Note
We recommend using Windows 10 or later.
The configuration program can be downloaded from https://pulsonalarm.pl/pl/files#oprogramowanie. Optional drivers are also available there; in some cases, they are required to run the program. In such cases, you must first install the drivers, restart your computer, and only then install the configuration program.
When you run the program for the first time, in the login window:
– select the folder where the program will be installed and where files containing data for the systems being booted will be saved.
– enter your login for the program. The default login is: admin, and there is no need to change it. The file containing data for the systems being booted is named: admin.db3 and contains encrypted data for all systems that we configure using this login.
If you need to save the configuration for a single system separately (for example, to provide a copy of the settings to an investor), change the name in the “Login” field to something else, such as “Mr. Kowalski,” and a separate file named “Mr. Kowalski.db3” will be created.
– Enter a password, which may contain letters and numbers. This password secures access to the configuration program.
This code can later be changed in the program’s main menu, under the User tab.
Regardless of this, the configuration of each new system will be protected by a 4-digit PC Communication Code assigned by the installer upon the first connection to the control panel. This code allows another installer to connect to the control panel and/or open the system configuration.
Note
The PC access code, required when connecting the control panel to the Alarm Configuration 2 software, can be retrieved from the system’s keypad in installer programming mode. Once in programming mode, go to the System > General tab; after scrolling down to the next screen, you will see the code needed to connect to the computer.
After logging into the program, a window will appear with the option to create a new system (button at the bottom of the window), and later also with a list of already installed systems. In the list of systems, the trash can icon allows you to delete a system.
When creating a new system, enter the name of the facility where the control panel is installed, the user’s last name, or another identifier that will allow you to locate the specific system in a list of multiple facilities. After adding the system, open it by double-clicking the system name to program it.
Configurator Features
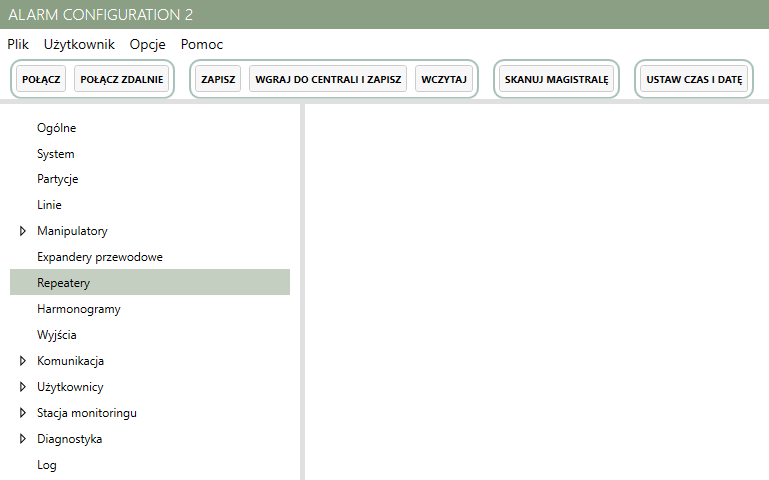
When you open the program’s main window, the main menu and function buttons are located in the upper-left corner of the screen. The tabs on the left side display the control panel’s programming functions. The layout of this menu corresponds to the one available when programming the system via the keypad.
Main Menu
– File: Use this option to exit the program.
– User: Allows you to change the program password and switch to another site from the list of previously created systems.
– Options: Select the number of retry attempts to reconnect to the control panel and change the program language.
Note
After changing the language, you must close the program and restart it.
– Help: Here you can view the program version.
Interface Description (Control Panel)
– Connect: After connecting to the control panel via a USB cable, press this button. The control panel will connect to the computer within a few seconds. This is confirmed by the button label changing to Disconnect, the text “Connected” appearing in the bottom bar of the program, and the text “Programming in progress” appearing on every keypad in the system. During the first connection, a window will appear asking you to enter a password. Enter any 4-digit password for connecting to the PC; it will be saved.
Note
When connecting the control panel to another computer, the program will require the same password.
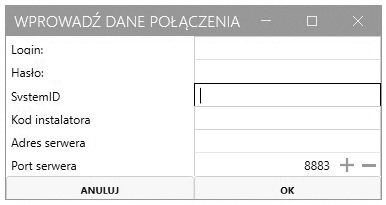
– Connect Remotely: This feature allows you to connect remotely to the control panel if it has an active GPRS or TCP/IP connection. After entering the connection details, the control panel will connect to the configuration program.
The login and password are associated with an additional remote tool for installers called Supervisor. To obtain the login and password, register at nss.pulsonalarm.pl
Nadzorca is a web-based platform provided to installers of PulsON Alarm 4G systems, enabling remote updates, programming, and functional changes to the panel, similar to the Alarm Configuration 2 software. Nadzorca also allows the panel to be remotely disabled if the customer/user fails to pay for the alarm system installation service. Once the outstanding balance is paid, the control panel can be unlocked, restoring its full functionality.
Note
The control panel can also be updated without using the Nadzorca platform. The user can initiate the update directly from the keypad. After logging in, the user enters the Menu, selects Settings, then the Update option, and confirms by selecting Update Now.
The remaining data pertains to the panel. It can be viewed (with the exception of the installer code) after logging into the keypad with a user code (and then OK > Menu > OR Code > System) or during a local connection to the panel using the Alarm Configuration 2 program.
– Save: The configuration for a given system can be prepared in Alarm Configuration without a connection to the control panel, for use at a later time. To save this configuration, press the Save button.
– Upload to the control panel and save: The prepared functional program and settings for the system must be uploaded to the control panel’s memory. The system configuration will also be saved in the program file.
– Load: Use this function to read the functional program of the control panel you are connecting to, in order to verify the settings or make changes to the program.
Note
If you load the control panel’s program while the configuration of another system is open, the loaded settings will overwrite the existing settings in the control panel if you select the “Upload to Control Panel and Save” function after loading. These settings will be different and will cause the control panel to operate inconsistently with the previous settings.
– Scan the bus: During the installation of the alarm system, after connecting all necessary keypads and modules with correctly set addresses, run the Bus Scan. The process will take several seconds, and upon completion, a list of connected devices will be displayed. If this matches the actual configuration, you can begin programming the system.
Note
A bus scan can also be performed in programming mode using the keypad or the dedicated button located above the battery on the control panel board. To start a bus scan using the button, press and hold the button during normal control panel operation until the blue LEDs indicating Wi-Fi and GSM range light up. After releasing the button, count the number of LED flashes, which corresponds to the number of active, detected modules (keypads and expanders) in the system.
– Set the time and date: For systems that do not use a GPRS or TCP/IP connection, you can use this button to retrieve the current time and date from the computer used to program the control panel. In this situation, if there is no internet connection, you must disable the Automatic Daylight Saving Time option in the System/Clocks menu (when programming via the keypad, in the Settings / Automatic Time Change menu).
Note
When you hover the mouse cursor over a control panel function in the configuration program window, the drop-down “tooltips” provide descriptions of what the selected function does.
Side Menu
On the left side of the configuration program window is the Side Menu, used to program the control panel’s user functions. The contents of this menu are described later in this manual. The Side Menu corresponds to the menu layout in Installer Programming mode, which is accessible to the installer via the keypad.
Below is a list of all options that have been implemented in the alarm system.