Rubber-key and touch-sensitive keypad
Logging in to the keypad
If an icon with a key symbol appears in the upper-right corner of the display, it means that the keypad is protected against unauthorized access. Arming or disarming a partition is not possible in this state. Function buttons and special alarm buttons (fire, medical, panic), if programmed by the installer, will function without the need to log in to the keypad.
To operate the system—arming/disarming, accessing the user menu, etc.—you must enter the correct access code (user code).
ATTENTION
The default master user code is 8888. The master user has the authority to manage the alarm system and assign codes and permissions to other users. In a newly activated system, the master code is the only user code.
The keypad verifies the user code in conjunction with the panel. After entering the correct code, the key icon in the upper-right corner of the screen disappears, and the display shows the partitions to which the logged-in user has access.
After logging in, you can, among other things, select partitions and perform arming and disarming operations in accordance with the user’s permissions. To access the system management menu (logs, zones, troubles, outputs, users, settings, etc.), press the OK/Menu button—the control panel will verify which functions are available to that user.
If, after logging in, the user does not press any button on the keypad within 45 seconds, the system will automatically log the user out—the key icon will reappear, and partition visibility will revert to the logged-out mode.
You can also log out manually by pressing the “Back” button on the main screen.
To log out of the keypad, press the "Back" button on the keypad.
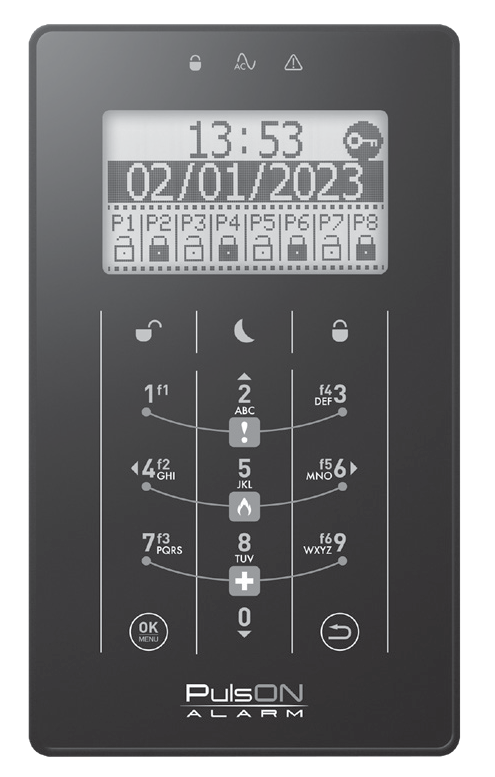
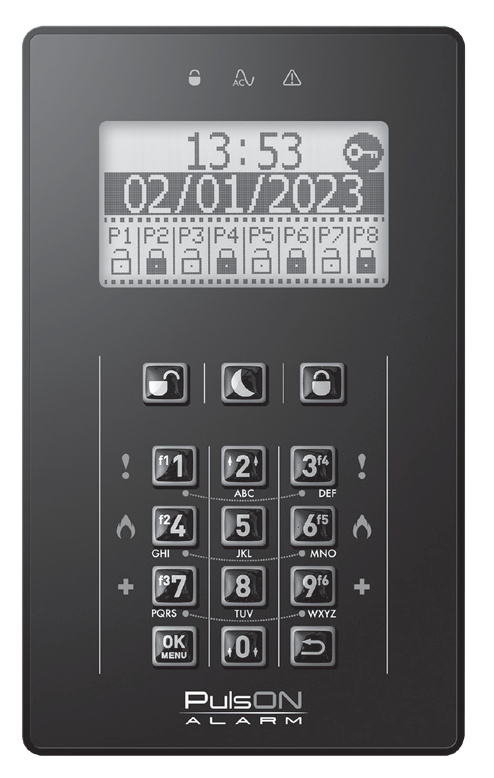
Navigating the Menu
PulsON LCD/C PulsON LCD/T
To navigate the menu on the home screen and in the user menu, use the navigation arrows located on buttons 2 (up), 0 (down), 4 (left), and 6 (right), as well as the (confirm) and (return to previous screen) buttons. To move the cursor to the right or left, hold down the 4 (left) or 6 (right) buttons for about 2 seconds. To delete text, hold down the key for about 2 seconds.
Main Screen
The main screen displays basic information about the system status.
- Current time and system date.
- Icon indicating that you need to log in.
- Information about the status of the partitions assigned to the keypad (as indicated by the icons described later in this manual).
Partition Screen
Warning
After a user logs in to the keypad, the number of partitions displayed may change, depending on the user’s permissions and the control panel’s settings.
The partition screen displays detailed information about violations of monitoring zones.
To access the partition screen, log in to the keypad using your user code, then hold down the down arrow (key 0) for 2 seconds and scroll to the desired partition.
If the partition is not ready to be armed, the names of the violated zones and the reason for the unreadiness will be displayed.
Partition Status
The keypad displays icons that indicate the current status of the alarm system:
System Status
At the top of the keypad, there are backlit symbols indicating the arming status of the partitions, the presence of 230V power, and trouble in the system.
Locked padlock symbol, red LED: A steady light indicates that all partitions assigned to the keypad are armed. A flashing symbol indicates that not all partitions are armed. AC symbol, green LED: A lit LED indicates the presence of 230V power.
ATTENTION
Depending on how the installer programmed the control panel, the way 230V power is indicated may vary: when power is present, the LED is on; when there is no power, the LED flashes.
Trouble indicator, yellow LED: lights up when there is a trouble in the system. The type of trouble can be checked by logging into the keypad, pressing the OK key, selecting Menu, then Trouble Overview, and finally Event Log.
Warning
Depending on how the panel was programmed by the installer, it may not be possible to arm the alarm system while there is a trouble until the trouble is resolved.
Arming and Disarming the System
To arm or disarm a partition, enter the user code of a user with the appropriate permissions. After entering the correct code, the key icon in the upper-right corner will disappear, and you will be able to select the partition to arm or disarm. To select the partition you want to arm or disarm, press the key with that partition’s number on the numeric keypad—the partition number above the partition status icon will be highlighted with a black bar.
It is possible to arm or disarm more than one partition at a time—in this case, use the numeric keypad to select multiple partitions (the key number corresponds to the partition number) and press the disarm or arm key.
Warning
If you want to select all available partitions, you can press the 0 key to select or deselect all partitions.
Once the partition(s) are selected, use the buttons below the display to choose the action to be performed: arm in full arming mode, arm in night mode, or disarm.
If the user has access to only one partition, after logging into the keypad, the partition will immediately be selected as ready for disarming or arming.
The open-door symbol indicates a zone violation. In this case, arming the system is not possible. If a zone with the Forced Arming feature enabled is violated, the open-door symbol will not appear, and the control panel will allow the system to be armed. This typically applies to zones with detectors near the keypad and the exit from the premises.
ATTENTION
The system arming and disarming functions, as well as most other control panel functions, are also available via the PulsON Alarm mobile app. How to use the mobile app is explained in the “Mobile App Manual.”
Arming in Night Mode
Arming a partition in night mode allows you to arm the partition while bypassing the zones defined by the installer as “night” zones. Typically, this arming mode is selected when the system user wishes to remain inside the monitored premises. After arming in night mode, the zones defined by the system installer as “night” will be automatically disabled.
Quick Arming
Quick arming allows you to arm the system without using a user code. Quick arming will arm all partitions assigned to the keypad in the selected mode. To use the quick arming feature, press and hold the “Arm in Full Mode” or “Arm in Night Mode” button for approximately 2 seconds.
The quick arming option must be enabled in advance by the installer (by default, the option is disabled).
Alarm Log
The alarm memory is a feature that records alarms from the last monitoring session. It allows you to check what caused the alarm and which detector was violated. This feature also serves as a warning, informing the user of a potential danger in the form of an intruder’s presence in the monitored premises.
When alarms are stored in memory, all LEDs above the LCD display flash, and the message “ALARM IN MEMORY” appears on the display.
Clearing the alarm log
To clear the alarm memory, enter the user code, select the partitions where the alarm occurred using the partition number keys, and press the disarm button. If you want to select all partitions available to the user, you can press the 0 key for convenience, which will select or deselect all partitions.
Special Alarms and Security Features
Triggering special alarms
There are 3 types of special alarms—those to which the system user has access at any time while the system is operational (provided the special alarm buttons have been enabled by the installer). Special alarms are used to trigger an alarm directly from the keypad. Alarms triggered from the keypad do not require code confirmation.
To trigger a special alarm, simultaneously press and hold for 2 seconds both buttons marked with the alarm symbol appropriate for the situation. Confirmation that the control panel has received the alarm signal is provided by the message “Alarm in memory” displayed on the keypad, flashing LEDs, and an audible tone from the keypad (the tone does not sound in the case of a panic alarm).
Keypad Lock for Cleaning
The keypad lock function for cleaning locks all buttons on the keypad for 20 seconds. During this time, you can clean the keypad’s touch surface without the risk of triggering unwanted events or alarms.
To activate the keypad lock, simultaneously press and hold the "OK/Menu" and "Back" buttons for 2 seconds.
Keypad Lock After an Incorrect Code
To protect against unauthorized access to the system, the keypad locks for 90 seconds after three consecutive incorrect code entries. After the first and second incorrect code entries, the message “Incorrect Code” is displayed. Once the keypad is locked, the message “Keypad Locked” appears, and a countdown to the end of the lock period begins. The lockout is progressive, meaning that while the keypad is locked, each incorrect code entry will extend the lockout duration.
System Management and Control
After entering the user code and pressing and holding the 0 key, you will see a system status overview. Use the up and down arrow keys (keys 2 or 0) to scroll through information about the status of partitions, zones, and arming readiness.
The word “Ready” displayed under the partition name indicates that the partition can be armed and placed in standby mode. If the name of a zone appears below the partition name with information about a zone violation or trouble, this means the partition is not ready to be armed (it cannot be armed because someone is moving in the indicated room or the monitoring zone is damaged). To arm the partition, you must resolve the cause of the unreadiness.
User Menu
To access the user menu, log in to the keypad using the access code of a user authorized to operate the system, and then press the “OK/MENU” button. After entering the menu, the user gains access to the following options:
You can navigate through the menu options by pressing the 0 and 2 keys (to select the next or previous option). After selecting the desired option, press the OK Menu key. To return to the main menu and exit the menu, press the back arrow key.
Event Log
The event log can display at least the last 2,048 events that occurred in the system.
Events related to the operation of the alarm system are stored in the event log in the order in which they occurred.
Events are displayed from the top, starting with the most recent ones. Each event includes the date and time it occurred, as well as information about which partition it originated from.
Information about the type of event is also displayed, indicating the name of the zone, user, or system module that triggered the event.
In the case of alarms, tampering, or trouble, once normal system operation is restored, a “Restored” message appears with a description of the situation it pertains to.
You can also view the event log from the PulsON Alarm mobile app, in the Log tab.
Blocking Zones
Blocking a zone allows you to temporarily disable it due to a detector malfunction or—for example—leaving a dog in a room with a detector. Blocked zones will not trigger an alarm while the system is armed. Zones are blocked only for the duration of the next system arming. After the system is disarmed, the detectors/zones will be active again.
To block a zone, select it using the up and down arrows and confirm by pressing the OK key. The letter B will appear next to the zone name, indicating that the detector is blocked. To unblock the zone, press the OK key again. The letter B will disappear.
You can also block zones in the PulsON Alarm mobile app, in the Zones tab.
Checking for Troubles
The Trouble Overview section displays any current system troubles. Troubles indicate irregularities in the operation of the system or its peripherals.
To determine the exact cause of a trouble, review the event log, where system events indicate the exact cause of the trouble.
After reading the trouble description in the Trouble Overview menu, press and hold the OK Menu button for 5 seconds to clear the message.
Trouble overview is also available in the PulsON Alarm mobile app, under the Log tab.
Output Control
The PulsON Alarm system allows users to enable and disable programmable outputs located on the panel’s main board or expansion modules.
This way, the user can use the keypad to activate—for example—lawn watering, garden lighting, or gate opening, provided the installer has made the appropriate connections.
The user can only control outputs defined by the system installer as “user outputs.”
To activate an output, select it using the up and down arrows and press the OK key. The status next to the output’s name will change to the opposite (OFF – ON). To deactivate the output, press the OK key again.
Output control is also available in the PulsON Alarm mobile app, under the Outputs tab.
User Management
The Users section is used to manage users. Depending on the user’s access level, they can edit the access rights of all users (in the case of the master code), all users except the master user (in the case of the supervisor code), and their own access code for other users.
When adding users, assign them permissions according to the descriptions displayed in the menu, in accordance with each user’s access level.
The most important steps are entering the user’s name, marking the user as active, assigning them to the correct partition, and entering the code digits. Without this information, the user will not have access to system controls.
The remaining options can be left enabled or disabled, depending on the user’s permissions.
The dark bar at the bottom of the screen labeled “Value:” shows the setting for the selected function or parameter.
Warning
For the security of the facility, users should change their system access code from time to time (for example, once a year). Simple codes (e.g., 5555) or codes related to the user’s date or year of birth should not be used.
QR Code
The “QR Code” tab displays the logged-in user’s code for automatically adding the control panel to the mobile app. Instructions for using the mobile app are provided in the “Mobile App Manual.”
Generally, install the PulsON Alarm app on your mobile device and add the system using the QR code reader. All system data will be read; you’ll need to enter the system name.
The “System” tab provides the information necessary to use the mobile app: the server address, communication port, and the control panel’s serial number.
When manually entering this information into the mobile app, verify that the data is correct and add the required user code and facility name.
Only then will the Save button become active.
Settings
The Settings tab is available only after entering the master code, supervisor code, or installer code.
This tab contains functions that affect the proper operation and security of the alarm system. For this reason, their use should be carefully considered or discussed with the system installer.
After selecting the Settings tab, press the OK Menu key. A set of service functions will be displayed.
Time and Date
This function allows you to set the current time and date, taking into account daylight saving time and the time zone. The time zone for Poland is +1 hour relative to UTC.
Allow Service
In accordance with the Polish Standard PN-EN 50131, the user/owner of the alarm system grants permission for the installer to perform service work: on a case-by-case basis or for an unlimited period. After entering this function, the user can select the time interval during which the installer will have service access to the control panel. Confirm the selection by pressing the OK key, and then select the Approve option in the next window.
If a specific date is displayed after entering the service authorization function, it means that service authorization has already been granted. If necessary, you can revoke it by selecting the Cancel option and exiting the menu using the back arrow key.
The procedure for granting access to service work is also described in the box on page 11.
Walk Test
This function allows the user to periodically test the operation of the detectors in their alarm system. After selecting this function, press the OK Menu key and decide whether the detector test should be accompanied by an audible signal (Enable BELL) or confirmed only on the keypad (No BELL). Confirm the signaling method by pressing the OK key, which will display a list of monitoring zones in your system, with the room names entered by the installer during system programming. Now you can violate the detectors one by one. After a violation, a short beep will sound from the siren (if selected) and the letter T will appear next to the zone names, confirming that the detectors are functioning properly.
You can also monitor violations of patrol zones in the PulsON Alarm mobile app, under the “Zones” tab. A violation is indicated by a house icon displayed to the left of the zone name.
To finish the test, exit this function by pressing the back arrow key several times.
Warning
According to the Polish Standard, the alarm system should be regularly tested and maintained by a certified installer. Tests include verifying proper operation and cleaning all detectors and system components, checking alarm signal transmission, verifying battery capacity, and checking connections to other systems. Alarm system maintenance should be performed at least once every six months.
Keypad Options
This function allows you to customize the keypad’s operation to suit your needs.
After confirming with the OK Menu key, the keypad options are displayed. Use the arrow keys to select one of the following options and confirm with the OK Menu key.
- Brightness: Select a value from 1 (darker) to 5 (brighter) by pressing keys 1–5, then confirm with the OK Menu key.
- Buzzer: Select a volume level from 1 (quieter) to 5 (louder) by pressing keys 1–5, then confirm with the OK Menu key.
- Backlight Timeout: Select the time after which the backlight will turn off if no keys are pressed; pressing any key will turn the backlight back on.
Warning
Setting the time to 000 [s] keeps the keypad backlight on continuously.
-
LCD Sleep: Here you can decide whether the LCD screen will turn off after the time set in the Backlight Time option; select YES or NO and confirm with the OK Menu key. During normal system operation, pressing any key will bring the screen back on.
-
LED Shutdown: Here you can decide whether the indicator LEDs at the top of the keypad will turn off after the time set in the Backlight Time option; select YES or NO and confirm with the OK Menu key. During normal system operation, pressing any key will turn the LEDs back on.
Warning
Changing a keypad’s settings applies only to the specific keypad on which you are making the changes. If there are multiple keypads in the system, you must make the changes independently on each one. An alarm system installer can also change these settings using the Alarm Configuration 2 program.
-
Restart the system: A service function used after updating the software version or to refresh the connection to the server; to be used during service work, in consultation with the system installer.
-
Update: A service function for updating the control panel software version; to be used during service work, in consultation with the system installer.
Warning
The panel software can only be updated when the alarm system is completely disarmed. No actions can be performed on the alarm system during the update. The update progress is displayed on the keypad as a percentage. Remote updating of the panel software is also possible. The update is performed by the installer after obtaining the user’s consent. The user grants service access to the control panel by enabling this feature from the keypad. Enter the user code, press the OK/Menu button, use the arrow keys to navigate to the Settings tab in the menu, and confirm with the OK button. Next, select the Allow Service option and, from the displayed time periods, choose the one appropriate for the situation, confirming your selection with the OK key. Service access can be granted for 1, 2, 4, or 8 hours, 1 day, or indefinitely. Your selection will be confirmed by a message on the keypad indicating the current duration of service access to the control panel, along with a Cancel option, which the user can use at any time to revoke the installer’s access to the control panel’s programming functions.
- System Info: After selecting this function, you can check the software version of all active components connected to the system bus. If there are version discrepancies, this may lead to system malfunction, and the system should be updated.
Installer Programming
This feature allows the installer to program the system. To do this, the user must grant the installer access to programming in the Settings – Allow Service menu, specifying the duration of access. Without the user’s consent, access to system programming is not possible.
Installer programming is available to an authorized installer after logging into the keypad with the installer code.
System programming is described in the Installer’s Manual.